> ## Documentation Index
> Fetch the complete documentation index at: https://docs.embedder.com/llms.txt
> Use this file to discover all available pages before exploring further.
# Quickstart
## Before you begin
Make sure you have:
* A terminal application (see recommendations below)
* A firmware project to work with (or start a new one)
### Recommended terminals
[Ghostty](https://ghostty.org/) for the best experience on macOS and Linux.
**macOS (Homebrew):**
```bash theme={"system"}
brew install --cask ghostty
```
**Linux:**
```bash theme={"system"}
# See https://ghostty.org/docs/install for distribution-specific instructions
```
The [VS Code extension](/integrations/vscode-extension) is recommended for the best experience on Windows.
We strongly recommend the [VS Code extension](/integrations/vscode-extension) for Windows users, but if you must use a terminal, [Alacritty](https://alacritty.org/) is recommended for the best experience on Windows.
**Using winget:**
```powershell theme={"system"}
winget install Alacritty.Alacritty
```
**Using Scoop:**
```powershell theme={"system"}
scoop install alacritty
```
## Step 1: Install and Launch Embedder
To install Embedder, use one of the following methods:
Enterprise customers have a custom install script. Contact your organization's point of contact or reach out to [founders@embedder.com](mailto:founders@embedder.com) for your installation instructions. After you install, you can proceed from step 2. Do not use the installation script below!
```bash theme={"system"}
curl -fsSL https://embedder.com/install | bash
```
Native installations automatically update in the background to keep you on the latest version.
Enterprise customers have a custom installation link or script. Contact your organization's point of contact or reach out to [founders@embedder.com](mailto:founders@embedder.com) for your installation instructions. After you install, you can proceed from step 2. Do not use the installation link or script below!
* **[Install for VS Code](vscode:extension/embedder.embedder-vscode)**
Follow the instructions in [Use Embedder in VS Code](/integrations/vscode-extension) for VS Code specific setup instructions.
We strongly recommend the VS Code extension for Windows users, but if you must use a terminal use the following script and setup instructions:
```powershell theme={"system"}
irm https://embedder.com/install | iex
```
Native installations automatically update in the background to keep you on the latest version.
To launch embedder, run `embedder` in your projects directory:
```bash theme={"system"}
cd your-project
embedder
```
## Step 2: Log in to your account
Embedder requires an account to use. When you start an interactive session with the `embedder` command, you'll need to log in:
```bash theme={"system"}
embedder
# You'll be prompted to log in on first use
```
Follow the prompts to log in with your account. If the web app doesn't automatically open, click the link on your screen.
Once logged in, your credentials are stored and you won't need to log in again. To switch accounts later, use the `/logout` command.
## Step 3: Start your first session
Open your terminal in any project directory and start Embedder:
```bash theme={"system"}
cd /path/to/your/project
embedder
```
You'll see the Embedder project selection screen.
### Creating a project
 ### Select your platform
After booting up, Embedder prompts you to select your hardware platform. Use the search box to filter platforms, then use the arrow keys to navigate and press Enter to select.
### Select your platform
After booting up, Embedder prompts you to select your hardware platform. Use the search box to filter platforms, then use the arrow keys to navigate and press Enter to select.
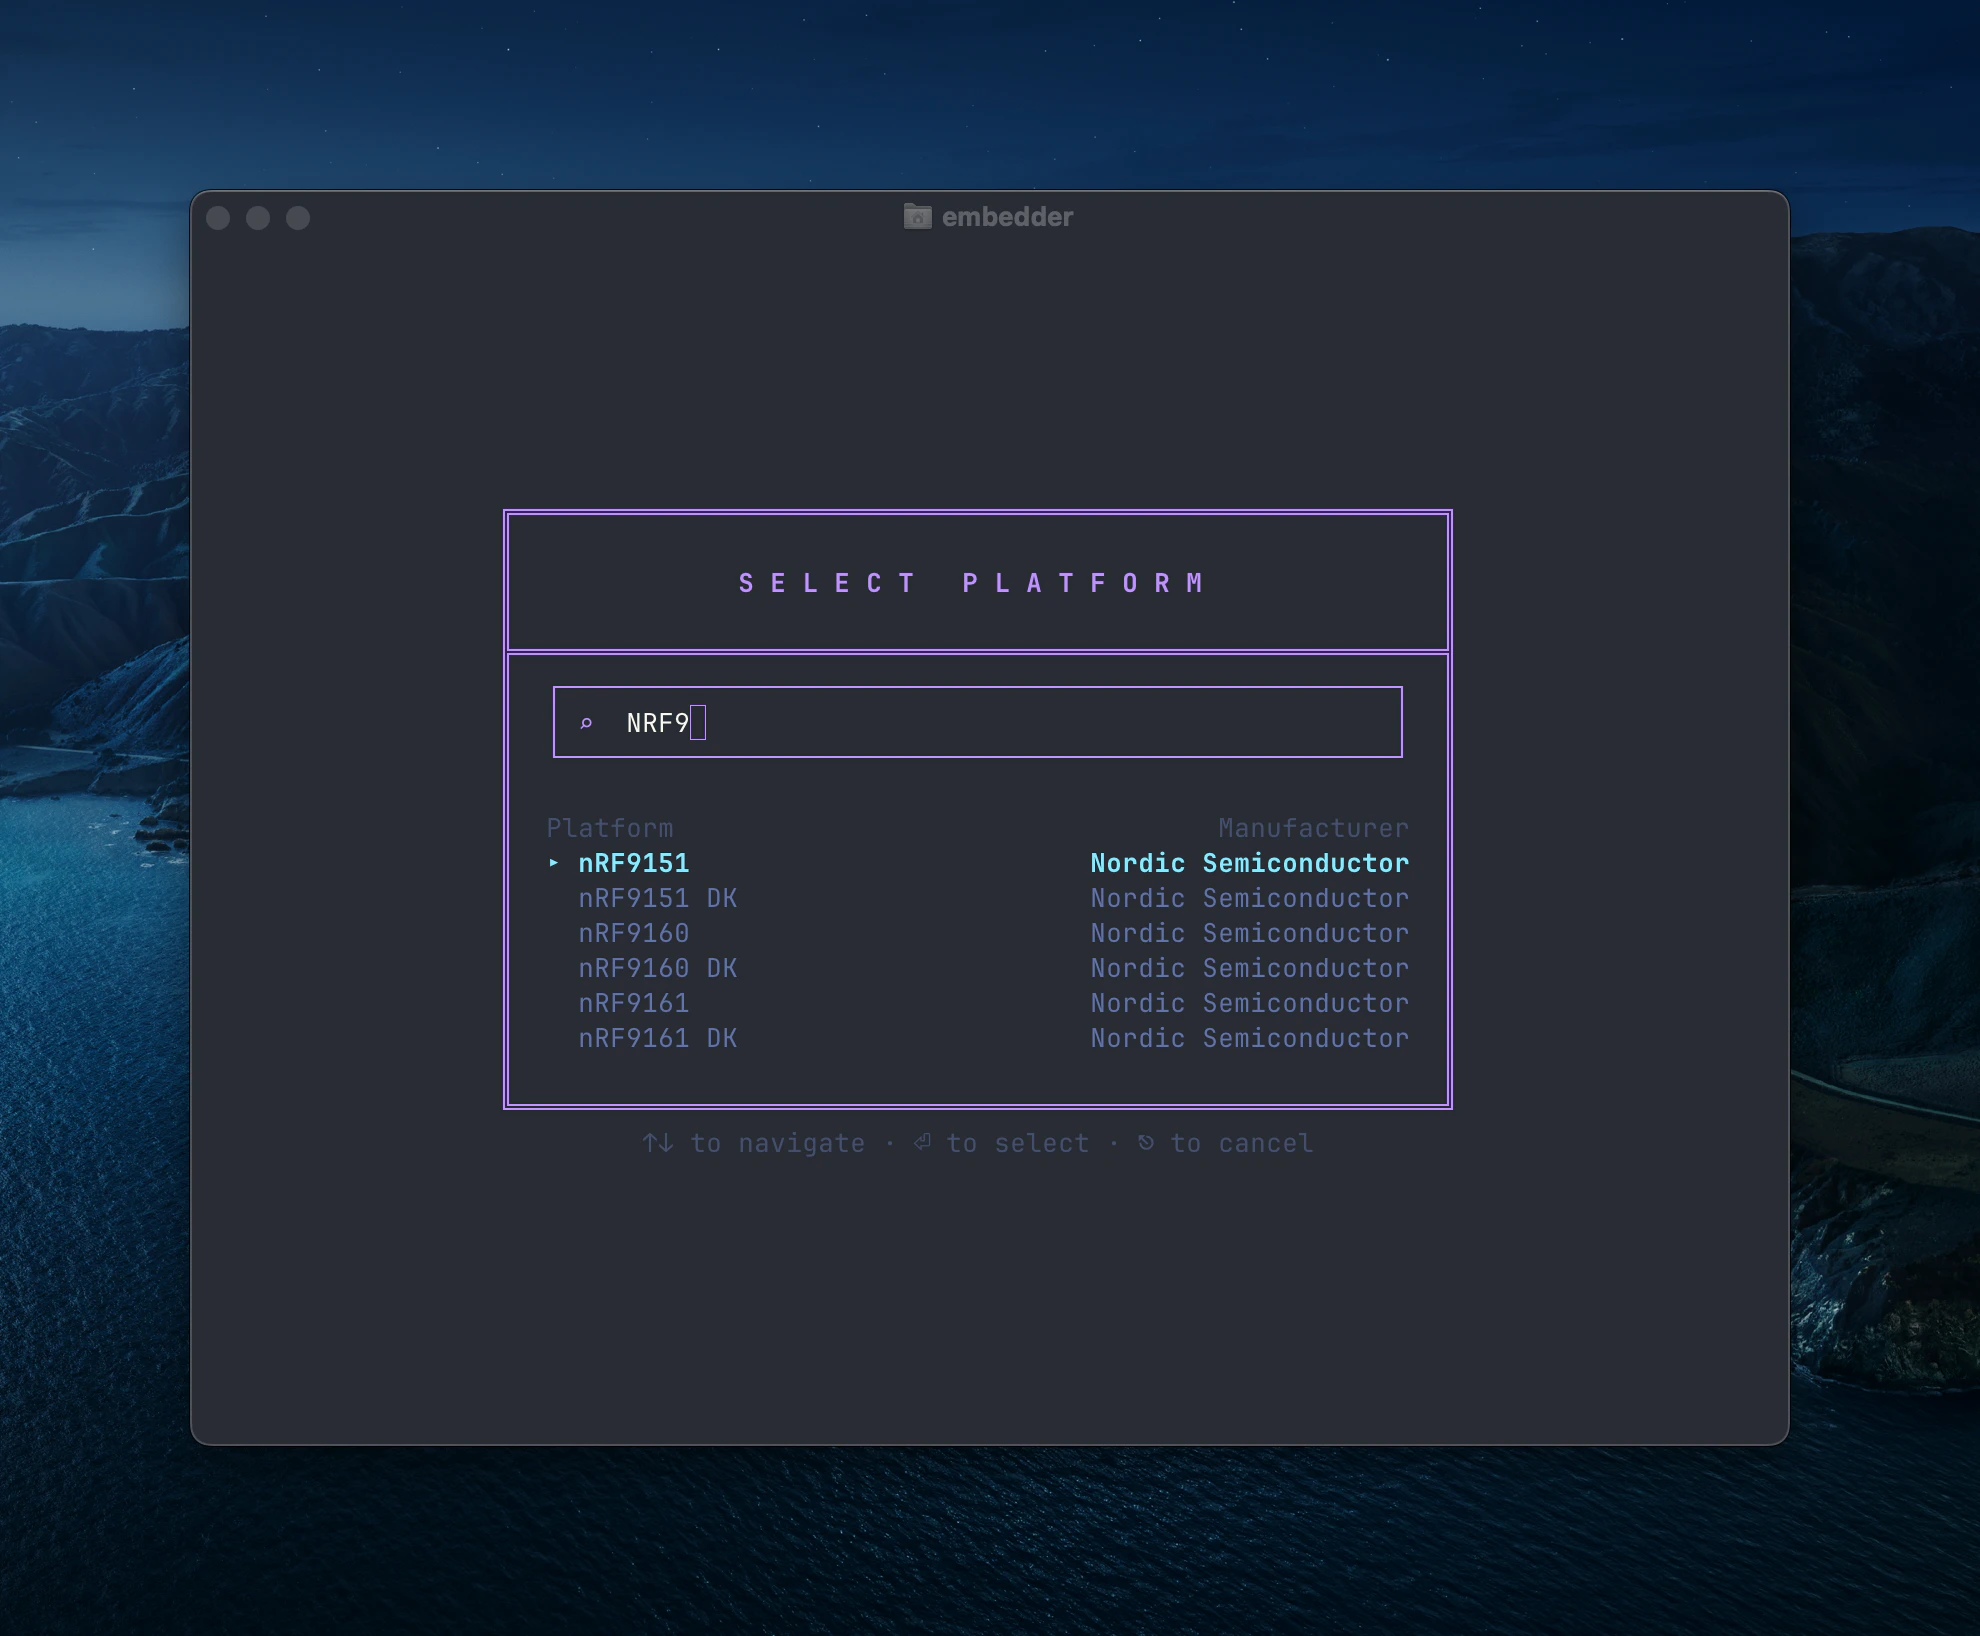 Select the platform that matches your hardware. Embedder uses the official documentation for your platform to ground its code generation and answers.
To add custom platforms, see [common workflows](/core-concepts/common-workflows).
The `/console` command lets you upload additional documentation to existing platforms and peripherals in your project.
### Select your peripherals
After selecting your platform, Embedder prompts you to configure your peripherals — the external components your project uses. See [Add a Peripheral](/core-concepts/add-peripheral) for the full walkthrough, including how to upload a custom peripheral with its datasheet.
You can change your peripheral configuration later using the `/peripheral` command.
## Step 4: Ask your first question
Once your platform and peripherals are configured, you can ask hardware-specific questions in natural language. Embedder references the relevant datasheets, reference manuals, and errata automatically. If a device is connected, it also reads serial output in real time.
Try asking about your hardware:
```
tell me about the nrf9151 gps capabilities
```
Select the platform that matches your hardware. Embedder uses the official documentation for your platform to ground its code generation and answers.
To add custom platforms, see [common workflows](/core-concepts/common-workflows).
The `/console` command lets you upload additional documentation to existing platforms and peripherals in your project.
### Select your peripherals
After selecting your platform, Embedder prompts you to configure your peripherals — the external components your project uses. See [Add a Peripheral](/core-concepts/add-peripheral) for the full walkthrough, including how to upload a custom peripheral with its datasheet.
You can change your peripheral configuration later using the `/peripheral` command.
## Step 4: Ask your first question
Once your platform and peripherals are configured, you can ask hardware-specific questions in natural language. Embedder references the relevant datasheets, reference manuals, and errata automatically. If a device is connected, it also reads serial output in real time.
Try asking about your hardware:
```
tell me about the nrf9151 gps capabilities
```
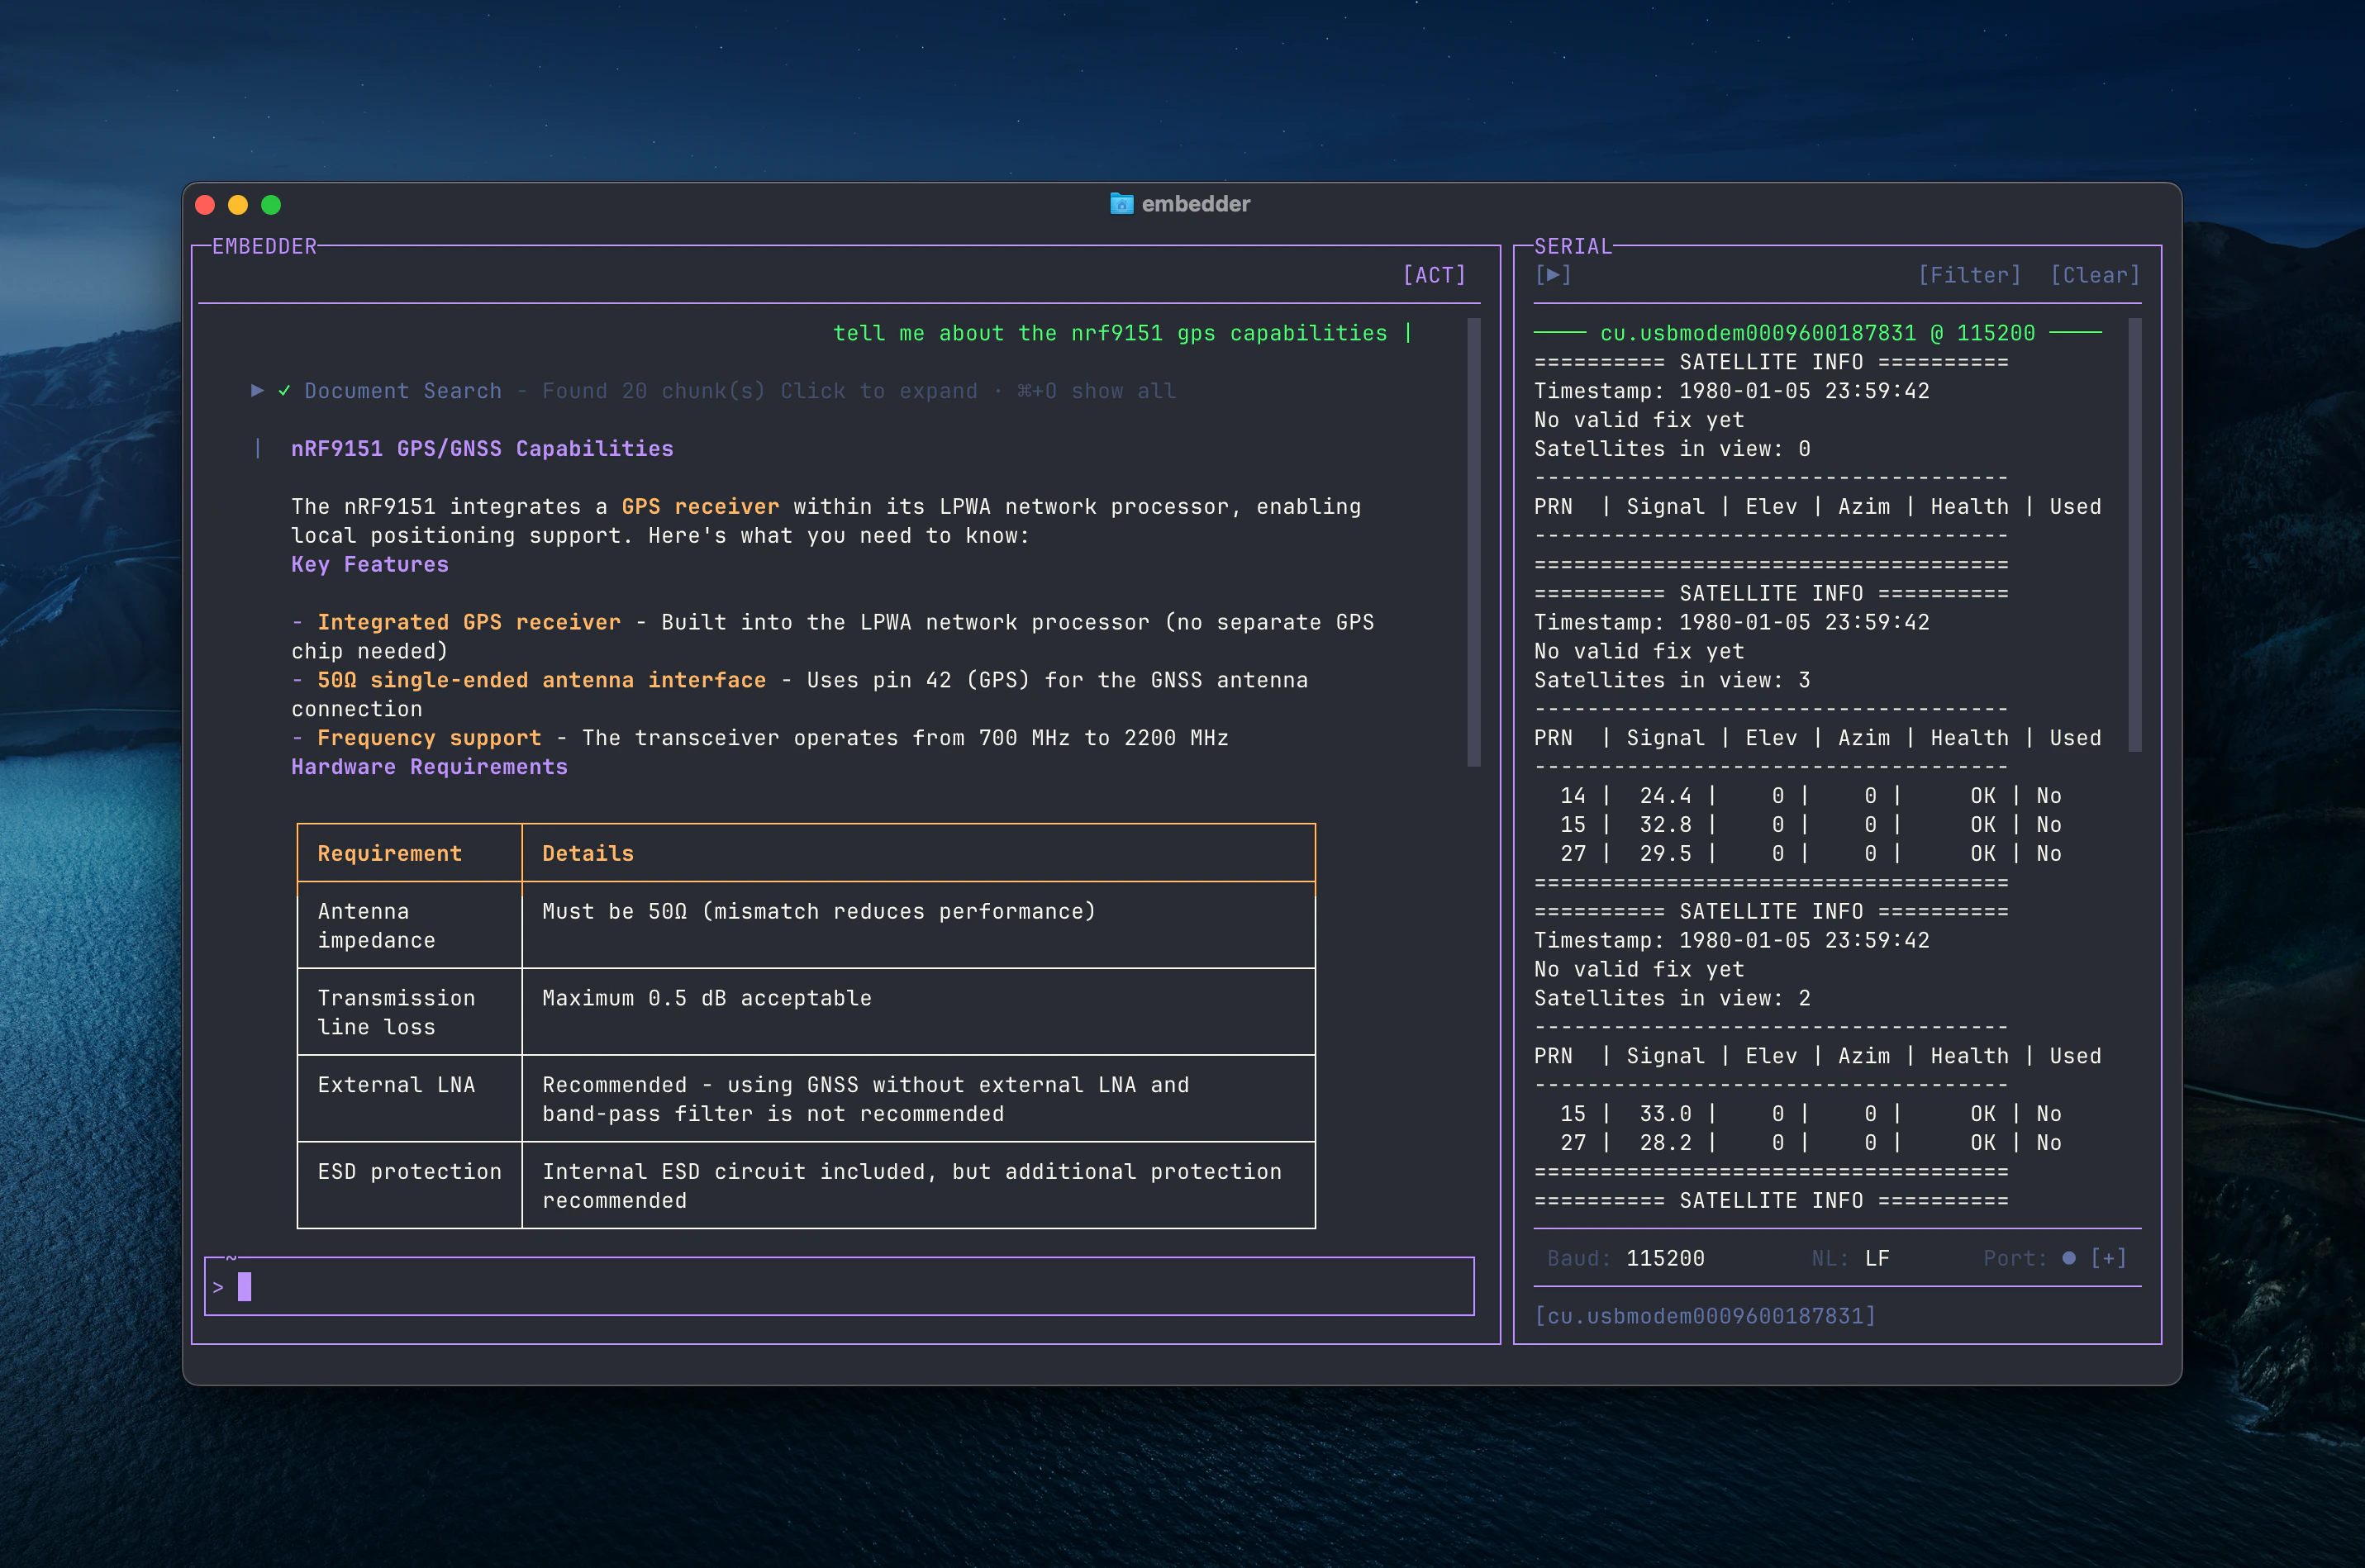 Embedder presents relevant documentation, including hardware requirements, pin configurations, and timing specifications. The serial monitor displays real-time output from your connected device.
You can also ask about your codebase:
```
what does this project do?
```
```
where is the main entry point?
```
```
explain the folder structure
```
Embedder reads your files and datasheets as needed - you don't have to manually add context.
## Step 5: Make your first code change
Now let's have Embedder generate some firmware.
Try a simple task:
```
add a function to toggle the LED on GPIO pin 13
```
Embedder will:
1. Find the appropriate file
2. Read the relevant register definitions from the datasheet
3. Show you the proposed changes with citations
4. Ask for your approval
5. Make the change
Embedder always asks for permission before modifying files unless told otherwise.
## Step 6: Use Git with Embedder
Embedder makes Git operations conversational:
```
what files have I changed?
```
```
commit my changes with a descriptive message
```
You can also prompt for more complex Git operations:
```
create a new branch called feature/uart-driver
```
```
show me the last 5 commits
```
```
help me resolve merge conflicts
```
## Step 7: Fix a bug or add a feature
Describe the issue you're seeing and Embedder will help you debug it:
```
my SPI peripheral isn't responding - help me debug
```
Or paste an error:
```
I'm getting a hard fault when I call HAL_UART_Transmit - why?
```
Embedder will:
* Check your code against the datasheet
* Look for common configuration mistakes
* Cross-reference known errata for your MCU
* Suggest and test fixes
## Step 8: Test out other common workflows
There are a number of ways to work with Embedder:
**Write a driver**
```
write an I2C driver for the BME280 temperature sensor
```
**Configure a peripheral**
```
set up PWM on Timer 2 with a 1kHz frequency
```
**Generate initialization code**
```
initialize the ADC for 12-bit resolution on channel 5
```
**Port code to a new platform**
```
help me port this STM32 driver to nRF52
```
See [common workflows](/core-concepts/common-workflows) for more information.
**Remember**: Embedder understands your hardware. Ask it questions the way you'd ask an experienced firmware engineer who has memorized the datasheet.
## Pro tips for beginners
Instead of: "configure the timer"
Try: "configure Timer 3 for a 10ms interrupt interval using the 16MHz HSI clock"
Break complex tasks into steps:
```
1. initialize the SPI peripheral at 1MHz
2. write a function to read a register from the accelerometer
3. add a function to configure the accelerometer for ±2g range
```
Before making changes, let Embedder understand your code:
```
analyze my clock configuration
```
```
what's the current interrupt priority setup?
```
See [best practices](/core-concepts/best-practices) for more tips.
## What's next?
Continue with [Best Practices](/core-concepts/best-practices) for tips on getting the best results, or [Common Workflows](/core-concepts/common-workflows) for practical examples.
## Getting help
* **In Embedder**: Type `/help` or ask "how do I..."
* **Documentation**: Browse our guides for detailed information
* **Community**: Join our Discord community for tips and support
Embedder presents relevant documentation, including hardware requirements, pin configurations, and timing specifications. The serial monitor displays real-time output from your connected device.
You can also ask about your codebase:
```
what does this project do?
```
```
where is the main entry point?
```
```
explain the folder structure
```
Embedder reads your files and datasheets as needed - you don't have to manually add context.
## Step 5: Make your first code change
Now let's have Embedder generate some firmware.
Try a simple task:
```
add a function to toggle the LED on GPIO pin 13
```
Embedder will:
1. Find the appropriate file
2. Read the relevant register definitions from the datasheet
3. Show you the proposed changes with citations
4. Ask for your approval
5. Make the change
Embedder always asks for permission before modifying files unless told otherwise.
## Step 6: Use Git with Embedder
Embedder makes Git operations conversational:
```
what files have I changed?
```
```
commit my changes with a descriptive message
```
You can also prompt for more complex Git operations:
```
create a new branch called feature/uart-driver
```
```
show me the last 5 commits
```
```
help me resolve merge conflicts
```
## Step 7: Fix a bug or add a feature
Describe the issue you're seeing and Embedder will help you debug it:
```
my SPI peripheral isn't responding - help me debug
```
Or paste an error:
```
I'm getting a hard fault when I call HAL_UART_Transmit - why?
```
Embedder will:
* Check your code against the datasheet
* Look for common configuration mistakes
* Cross-reference known errata for your MCU
* Suggest and test fixes
## Step 8: Test out other common workflows
There are a number of ways to work with Embedder:
**Write a driver**
```
write an I2C driver for the BME280 temperature sensor
```
**Configure a peripheral**
```
set up PWM on Timer 2 with a 1kHz frequency
```
**Generate initialization code**
```
initialize the ADC for 12-bit resolution on channel 5
```
**Port code to a new platform**
```
help me port this STM32 driver to nRF52
```
See [common workflows](/core-concepts/common-workflows) for more information.
**Remember**: Embedder understands your hardware. Ask it questions the way you'd ask an experienced firmware engineer who has memorized the datasheet.
## Pro tips for beginners
Instead of: "configure the timer"
Try: "configure Timer 3 for a 10ms interrupt interval using the 16MHz HSI clock"
Break complex tasks into steps:
```
1. initialize the SPI peripheral at 1MHz
2. write a function to read a register from the accelerometer
3. add a function to configure the accelerometer for ±2g range
```
Before making changes, let Embedder understand your code:
```
analyze my clock configuration
```
```
what's the current interrupt priority setup?
```
See [best practices](/core-concepts/best-practices) for more tips.
## What's next?
Continue with [Best Practices](/core-concepts/best-practices) for tips on getting the best results, or [Common Workflows](/core-concepts/common-workflows) for practical examples.
## Getting help
* **In Embedder**: Type `/help` or ask "how do I..."
* **Documentation**: Browse our guides for detailed information
* **Community**: Join our Discord community for tips and support